Add Images
In Moodle, you can add an image anywhere you see the Text editor toolbar.

Instructors can use images in activity descriptions (e.g., the description for an Assignment, Quiz questions, a post to a Forum, or in a Page resource). Students can add images, when posting in a forum, submitting a text-based assignment, taking a quiz, contributing to a database activity, etc. ). The Image properties window will open.Screen Shot of Text Editor
In the Image properties window, click Browse repositories... The File picker window will open.
In the File picker window:
). The Image properties window will open.Screen Shot of Text Editor
In the Image properties window, click Browse repositories... The File picker window will open.
In the File picker window:
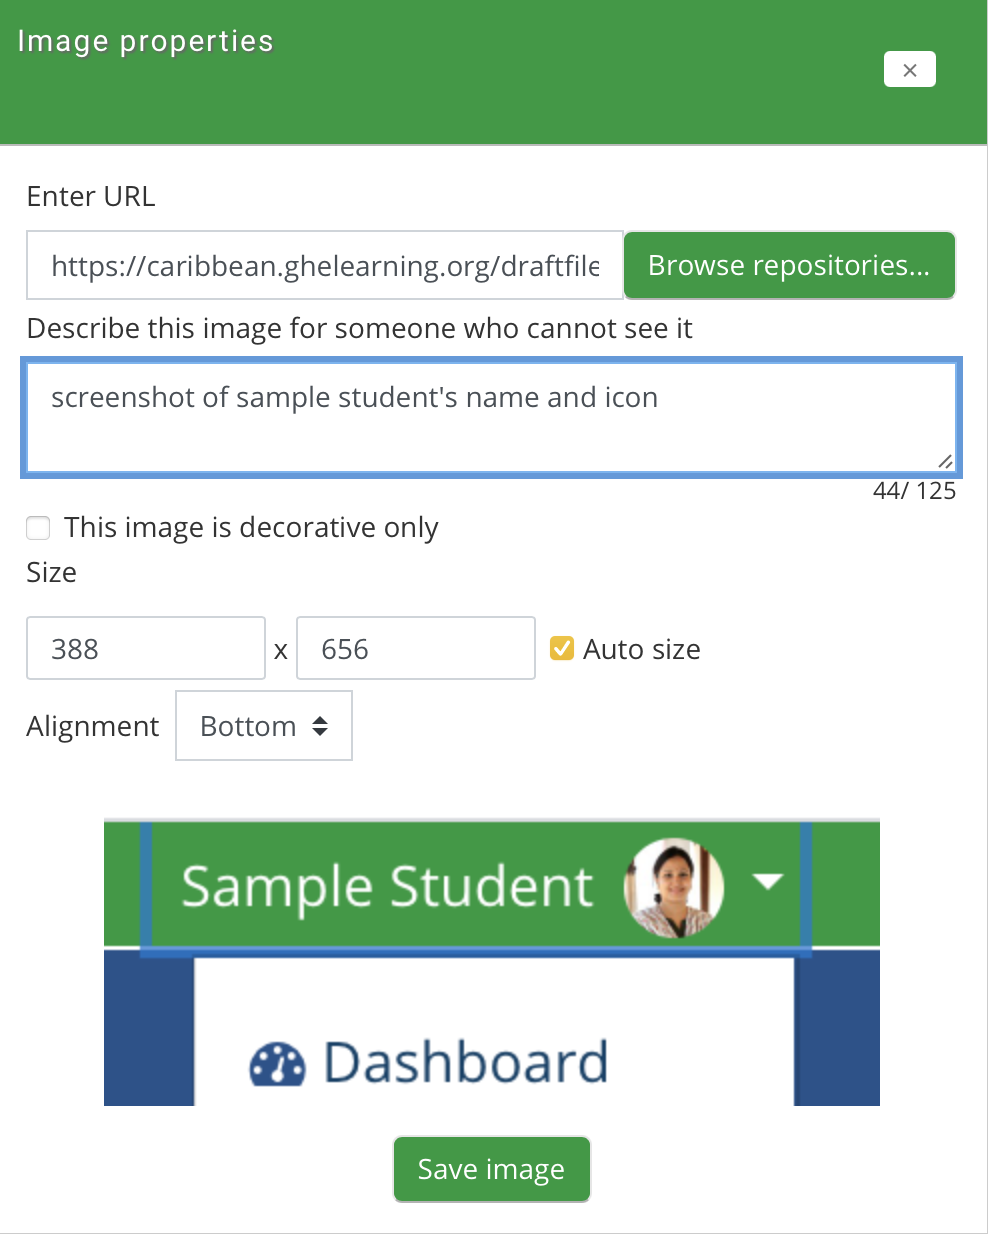
To Describe this image for someone who cannot see it, (required) enter a brief description of the image, or select the check box for Description not necessary. We strongly recommend describing each image to make your content accessible to all. Note: You will be unable to insert an image unless you provide a brief description of the image in Describe this image for someone who cannot see it or check Description not necessary. To resize your image, check Auto size, then enter a new width or height. (When you click away from the entry box, the other dimension will auto-complete). To align your image to the left or right of text (for example), use the Alignment drop-down menu. Select Save image. The image will be inserted in the Editor window. Note: You can reopen to the Image properties window by double-clicking an image to adjust the alignment, size, etc.
Select Save image. Note: You can reopen to the Image properties window by double clicking on an image in the Editor.
Instructors can use images in activity descriptions (e.g., the description for an Assignment, Quiz questions, a post to a Forum, or in a Page resource). Students can add images, when posting in a forum, submitting a text-based assignment, taking a quiz, contributing to a database activity, etc.
Add an Image Using the File Picker
In the Text editor toolbar, click the Insert or edit image icon (- To upload a file from your computer, click Upload a file (at left).
- To use a file already uploaded to Moodle, click Recent files, Server Files, Private Files or Embedded files (at left).
- To copy a file from Google Drive or Box into Moodle, select Google Drive or Box.
To Describe this image for someone who cannot see it, (required) enter a brief description of the image, or select the check box for Description not necessary. We strongly recommend describing each image to make your content accessible to all. Note: You will be unable to insert an image unless you provide a brief description of the image in Describe this image for someone who cannot see it or check Description not necessary. To resize your image, check Auto size, then enter a new width or height. (When you click away from the entry box, the other dimension will auto-complete). To align your image to the left or right of text (for example), use the Alignment drop-down menu. Select Save image. The image will be inserted in the Editor window. Note: You can reopen to the Image properties window by double-clicking an image to adjust the alignment, size, etc.
Add an Image Using a URL
If the image you will add is stored on another website, you can embed it using its URL. In the Text editor toolbar, select Insert or edit image (Add an image icon screenshot). The Image properties window will open.Screen Shot of Text Editor In the Enter URL field, enter the complete URL for your image. Important: Be sure to include the http:// or https:// prefix. (For example: https://www.moh.gov.jm/wp-content/gallery/teen-hub-launch-at-the-half-way-tree-transport-center-tuesday-november-28-2017/IMG_1031.JPG) Set additional image properties.Select Save image. Note: You can reopen to the Image properties window by double clicking on an image in the Editor.
Align an Image
The alignment of images loaded in Moodle is configured in the Image properties window of each image. In the Editor entry box, double-click the image. The Image properties pop-up will open. The Alignment drop-down menu gives you an option to select either Top, Middle, Bottom, Left or Right alignment. Once you have selected the Alignment options, click Save image. The Image properties window will close and the image will appear in the Text editor entry box aligned as set.Adjust Image Size
Recommended Image Dimensions Moodle will scale each image automatically to fit within the available area the image is placed in, such as a forum post, label, or block. This makes images "responsive" (meaning that even a very wide image will fit on the screen, whether viewed on a mobile phone, tablet or large computer display). While Moodle also allows you to force the size that an image appears on a page, the image file still downloads at it's original dimensions. Therefore:- If you upload a large image (e.g., from a camera) and set it to display very small, page-load time will be slow.
- If you upload a very small image and set it in Moodle to appear larger than its actual pixel dimensions, the image will appear blurry.
| Image Use | Image Type | Pixels Dimensions |
|---|---|---|
| Thumbnail | A small version of an image that links to a larger version | ~ 100 pixels wide |
| Banner image | A wide, short image for example, in a Section summary or Label | 1600 pixels wide |
| Image in a block | An image placed in an Moodle HTML block | No more than 340 pixels wide |
| Illustration | An image placed within a page of text. | 250 to 400 pixels wide |
| Full sized image | The largest possible image to display in Moodle (with blocks docked) | 1600 pixels wide |
Set Image Size Attributes
To force the maximum dimensions that an image displays:In the Editor text box, add a new image or double-click an already existing image. The Image properties pop-up will open.In the Image properties window locate Size. Select Auto size (at right) to prevent distorting the image.Change the value inside one of the boxes to shrink the image (we do not recommend enlarging). The editor will automatically adjust the other dimension (width x height) .To confirm changes, click Save image. The Image properties window will close and the image will appear in the Editor text box.Note: This process only changes the size an image is displayed in Moodle. It does not affect the image file. This process can be repeated as many times as needed without affecting the original dimensions of the uploaded file.Last modified: Thursday, 19 November 2020, 3:54 PM